阅读门槛:需要了解一些香橙派开发板的基础知识(可以去看看我之前的文章有介绍),linux系统的相关知识,并且会看基本的python代码,我的机子烧录的系统是 Ubuntu22,其它系统的话可以作为参考。
简介 本文主要记录通过 orangePi(香橙派)连接温度传感器,并用Python 脚本最终实现温度监控的过程。主要是其间有不少坑,我也算是提前踩了,希望对你们有用。
前期准备
orangePI zero 3(其它的板子也行)
面包板
Ds18b20 温度传感器
小灯珠(可选)
操作流程 1. 线路连接 首先我们需要知道开发板的每个pin针脚代表的意思。可以参考我之前的介绍orangePI的文章。
当知道原理的情况下,连接起来就很简单。
我们需要知道的是温度传感器上有三个引脚,分别对应的:
红色:电源(我接的是5v电压,由于温度传感器可以支持3.3v - 5.5v电压,所以 3v 电压引脚也是可以的)
灰色:地线
绿色:数据传输(理论上只要是gpio的口都可以,我这里连接的是pin12引脚)
连接原理图参考如下:
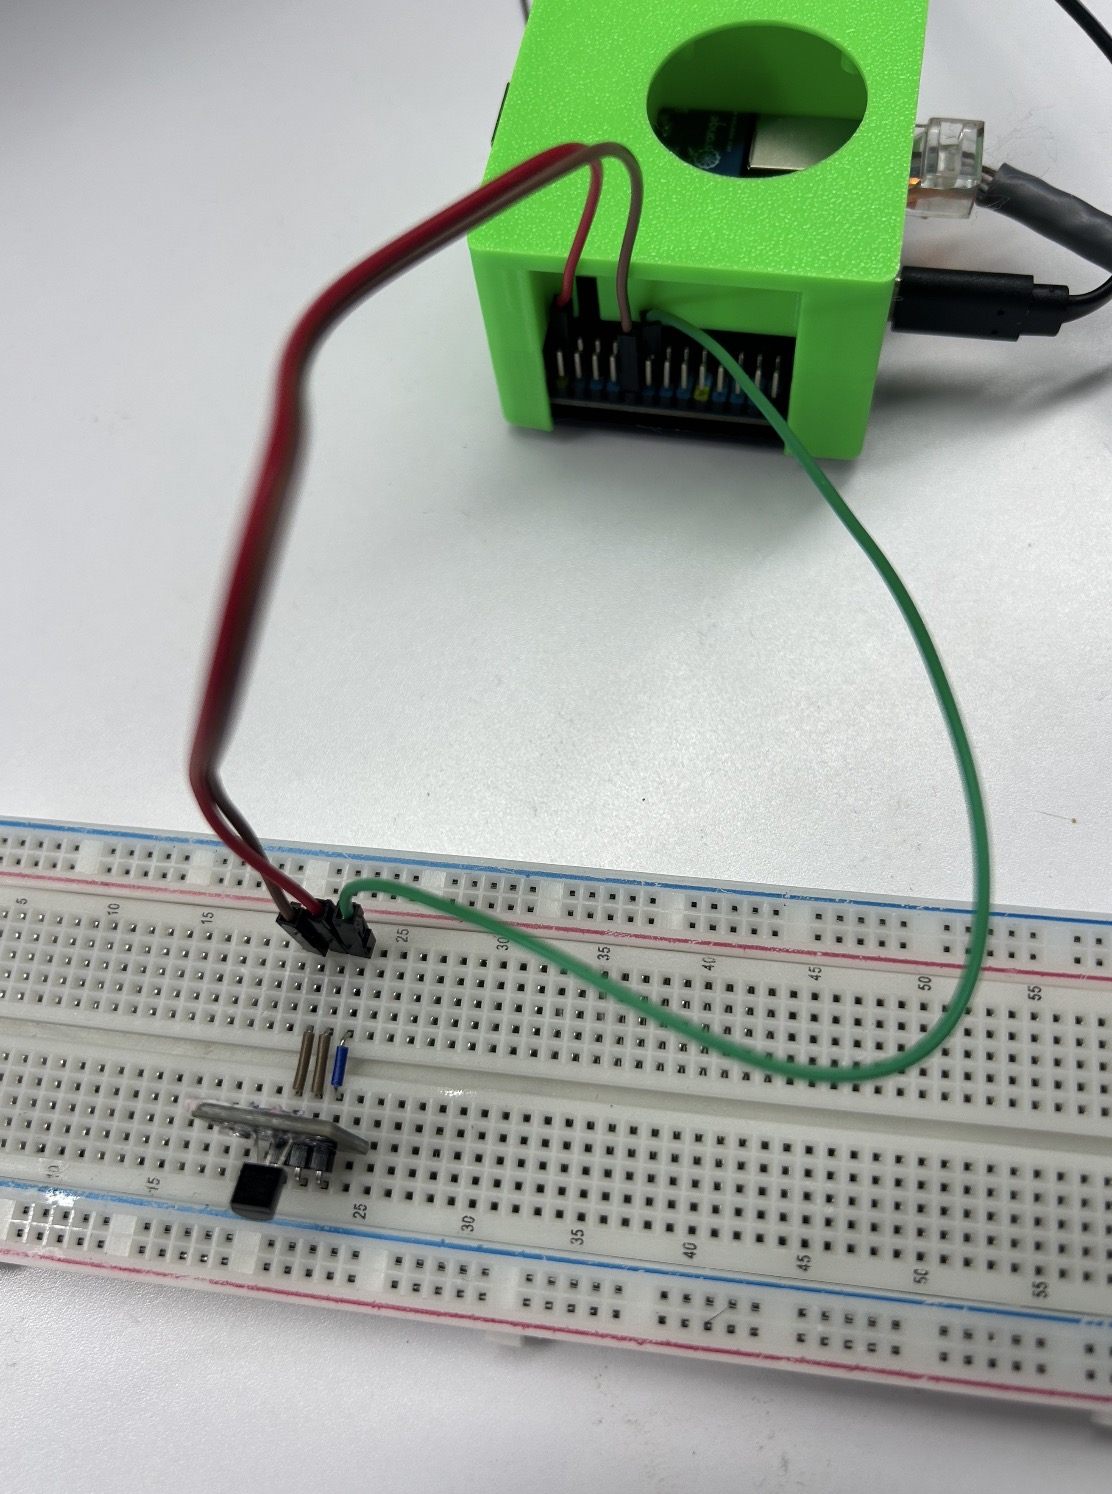
我这里用了额外的连接线方便用小灯珠调试,实际操作过程中这个额外的连接杜邦线可以不用,按照上面的连接原理形成一个电路闭环即可,实物连接图如下:
线连接好,基本上已经成功一半了。接下来就是代码的编写了。
2. 安装环境依赖 这里我用到了一个依赖包 wiringpi,默认情况下香橙派是自带的,这个步骤就可以跳过。
如果系统没有的话也可以自己安装一下,步骤也很简单(以下步骤需要在root权限下运行)
一、安装依赖包 1 2 root@orangepi:~# sudo apt-get update root@orangepi:~# sudo apt-get -y install git swig python3-dev python3-setuptools
二、下载 wiringOP-Python 的源码
注意,下面的 git clone –recursive 命令会自动下载 wiringOP 的源码,因为wiringOP-Python 是依赖 wiringOP 的。请确保下载过程没有因为网络问题而报错。
1
2
root@orangepi:~# git clone --recursive https://github.com/orangepi-xunlong/wiringOP-Python -b next root@orangepi:~# cd wiringOP-Python root@orangepi:~/wiringOP-Python# git submodule update --init --remote
三、编译 wiringOP-Python 1 2 root@orangepi:~# cd wiringOP-Python root@orangepi:~/wiringOP-Python# python3 generate-bindings.py > bindings.i root@orangepi:~/wiringOP-Python# sudo python3 setup.py install
四、查看安装是否成功 当提示下面的内容,则表示安装成功了!
1 2 3 4 5 6 7 8 9 root@orangepi:~/wiringOP-Python# python3 -c "import wiringpi; help(wiringpi)" Help on module wiringpi: NAME wiringpi DESCRIPTION # This file was automatically generated by SWIG (http://www.swig.org). # Version 4.0.2 # # Do not make changes to this file unless you know what you are doing--modify # the SWIG interface file instead. ...
3. 代码编写 创建一个脚本叫:index.py,参考以下代码:
1 2 3 4 5 6 7 8 9 10 11 12 13 14 15 16 17 18 19 20 21 22 23 24 25 26 27 28 29 30 31 32 33 34 35 36 37 38 39 40 41 42 43 44 45 46 47 48 49 50 51 52 53 54 55 56 57 58 59 60 61 62 63 64 65 66 67 68 69 70 71 72 73 74 75 76 77 78 79 80 81 82 83 84 85 86 87 88 89 90 91 92 import wiringpifrom wiringpi import GPIOimport timePIN = 6 def oneWireReset (pin ): wiringpi.pinMode(pin, GPIO.OUTPUT) wiringpi.digitalWrite(pin, GPIO.HIGH) wiringpi.digitalWrite(pin, GPIO.LOW) wiringpi.delayMicroseconds(500 ) wiringpi.digitalWrite(pin, GPIO.HIGH) wiringpi.delayMicroseconds(60 ) wiringpi.pinMode(pin, GPIO.INPUT) if not wiringpi.digitalRead(pin): ack = 1 else : ack = 0 wiringpi.delayMicroseconds(500 ) return ack def writeBit (pin, bit ): wiringpi.pinMode(pin, GPIO.OUTPUT) wiringpi.digitalWrite(pin, GPIO.LOW) wiringpi.delayMicroseconds(2 ) wiringpi.digitalWrite(pin, bit) wiringpi.delayMicroseconds(80 ) wiringpi.digitalWrite(pin, GPIO.HIGH) wiringpi.delayMicroseconds(1 ) def oneWireSendComm (pin, byte ): i = 0 while i < 8 : sta = byte & 0x01 writeBit(pin, sta) byte >>= 1 i += 1 def readBit (pin ): wiringpi.pinMode(pin, GPIO.OUTPUT) wiringpi.digitalWrite(pin, GPIO.HIGH) wiringpi.digitalWrite(pin, GPIO.LOW) wiringpi.delayMicroseconds(2 ) wiringpi.digitalWrite(pin, GPIO.HIGH) wiringpi.pinMode(pin, GPIO.INPUT) wiringpi.delayMicroseconds(2 ) tmp = wiringpi.digitalRead(pin) wiringpi.delayMicroseconds(40 ) return tmp def oneWireReceive (pin ): i = 0 k = 0 while i < 8 : j = readBit(pin) k = (j << 7 ) | (k >> 1 ) i += 1 k = k & 0x00FF return k def tempchange (lsb, msb ): if (msb >= 0xF0 ): msb = 255 - msb lsb = 256 - lsb tem = -(msb*16 *16 + lsb) else : tem = (msb*16 *16 + lsb) temp = tem*0.0625 print ("Current Temprature: %.2f" %(temp)) def main (): wiringpi.wiringPiSetup() lsb = 0 msb = 0 if oneWireReset(PIN): oneWireSendComm(PIN, 0xcc ) oneWireSendComm(PIN, 0x44 ) if oneWireReset(PIN): oneWireSendComm(PIN, 0xcc ) oneWireSendComm(PIN, 0xbe ) lsb = oneWireReceive(PIN) msb = oneWireReceive(PIN) tempchange(lsb, msb) if __name__ == '__main__' : while True : main() time.sleep(2 )
4. 结果展示 运行脚本:python index.py, 就会有当前实时温度信息展示
小结 随着对开发板的日渐熟悉,我越来越坚定软件硬件都是服务于人类的。每个人都可以通过自己DIY来让自己的生活更上一层楼。而这需要的成本是非常低的。
我的快乐很简单,就是自己动手创造一个自己喜欢的生活方式,构建一个自己想要的世界。拜拜👋